For those of you who already know your size, you can look over our sizing chart of our 20 stock sizes and see if one of them will work. Otherwise, continue on, and we're at your service.
FITTING INSTRUCTIONS
 Remember to submit these numbers on the fit form
More Options
 If you prefer, you can download full instructions in a printable PDF format right here
 Watch our online video instructions on Vimeo

If you own a metric tape measure you can take the measurements in metric. If not we will convert for you. To perform the fit you will need a partner, a tape measure, and a rigid ruler or carpenter's square. The measuring needs to be done in bare feet or light socks while holding your body erect.
1.) INSEAM:
While standing with your feet about 2 inches apart pull the ruler firmly up into your crotch, keeping one hand in front and one in back. Have your partner make sure the ruler is level and record the distance from the top of the ruler to the ground. If using a carpenter's square do all measuring against a wall to maintain level on the square.2.) THIGH:
While kneeling with your knees about 5 cm apart, follow the same procedure as for the inseam measurement.3.) FOOT LENGTH:
Position your heels against the wall and measure the distance from the wall to the end of the large toe.4.) TORSO:
This is the reverse inseam measurement. Hold the ruler level against your crotch and have your partner measure the distance from the ruler to the top of your manubrium (This is the 'V' shaped soft area below your Adam's apple. The measurement will be to the bottom of 'V'.) This is easy to do if your partner hooks the tape on the bottom edge of the ruler and subtract the width of the ruler before the measurement is recorded.5.) ARM:
With the ruler held the way an archer would grip a bow, hold your arm at about a 45 degree angle extended out to the side. You partner will measure from the ruler to the edge of your shoulder.6.) SHOULDER WIDTH:
Measure the distance from the edge of each shoulder from acromion* to acromion*. * The edge of your shoulder is marked by the acromion. To find the acromion, let your arm hang down at your side. With the other hand, feel down the side of your neck and along the top of your shoulder. Just about where the top of your shoulder ends and your arm begins, you will feel a bony point. This is your acromion. Check to make sure that you have found the right spot by continuing to feel the point with your finger while you move your arm around. You will feel that this is the point where the movement of your arm originates. Remember to subtract the width of the ruler before recording the measurement.7.) YOUR HEIGHT
8.) YOUR WEIGHT
EXISTING BIKE NUMBERS:
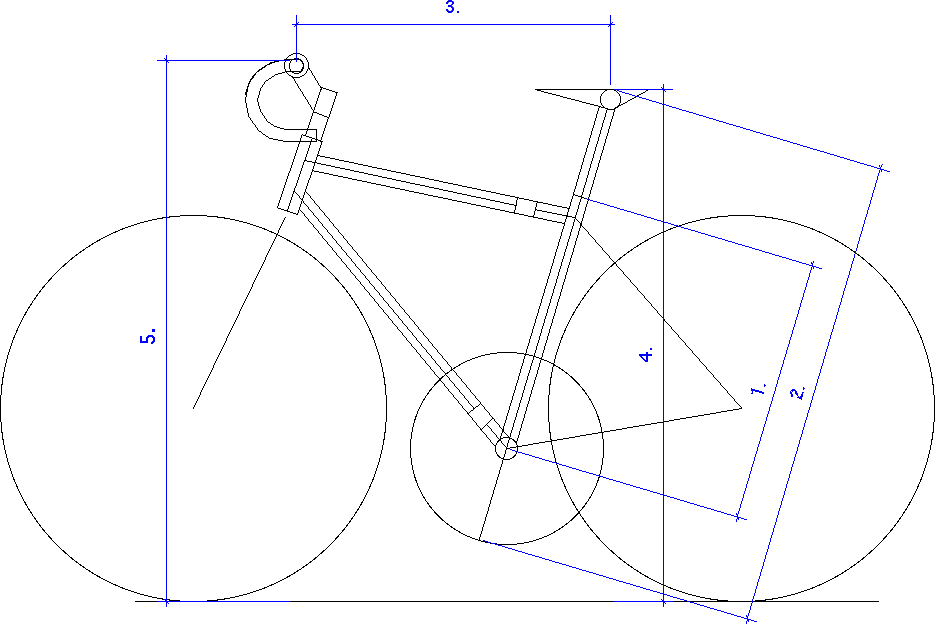
If you are currently riding a bike that you like, or dislike, it will be helpful if we know the current fit measurements that you are used to. If you really like, or dislike, your current bike we will be discussing all of that via e-mail or phone before we set up your new bike.1.) Seat tube:
Along the angle of the seat tube measure from the center of the bolt that holds on the cranks to the top of the tube that the seat post is inserted into.2.) Seat height:
Along the angle of the seat tube measure from the pedal in it's lowest position to the top of the seat.3.) Reach to bars:
Measure from the center of the seat post where it attaches to the seat to the center of the handlebars. For this measurement hold the tape level to the ground.4.) Seat to ground:
Measure from the top of the seat to the ground. Hold the tape measure perpendicular to the ground.5.) Bars to ground:
Measure from the top of the bars to the ground. Hold the tape measure perpendicular to the ground.


